In this article, I’m going to share with you a the best stretches for backbend for all levels.
If you are a total beginner, the backbend position can be very difficult to master. It requires you to have mobility in your shoulders, neck, lower back, AND feel comfortable while being upside down.
Although I originally mastered this skill at a very young age, I believe it is possible for anyone to master this regardless of advancement in life. With time, consistency, and safe practice, you too can do the wheel.
Not to mention, many of these exercises that are aimed for opening up the shoulders and lower back should help with pain for those afflicted with problems in those areas.
This guide will help you if you are a total beginner to do the back bridge and if you are trying to learn how you can open up your mobility in order to master this pose.
The following content may contain affiliate links. When you make a purchase using these links, I receive a commission at no extra cost to you. Thank you for supporting this website.
WHAT IS A BACK BEND?
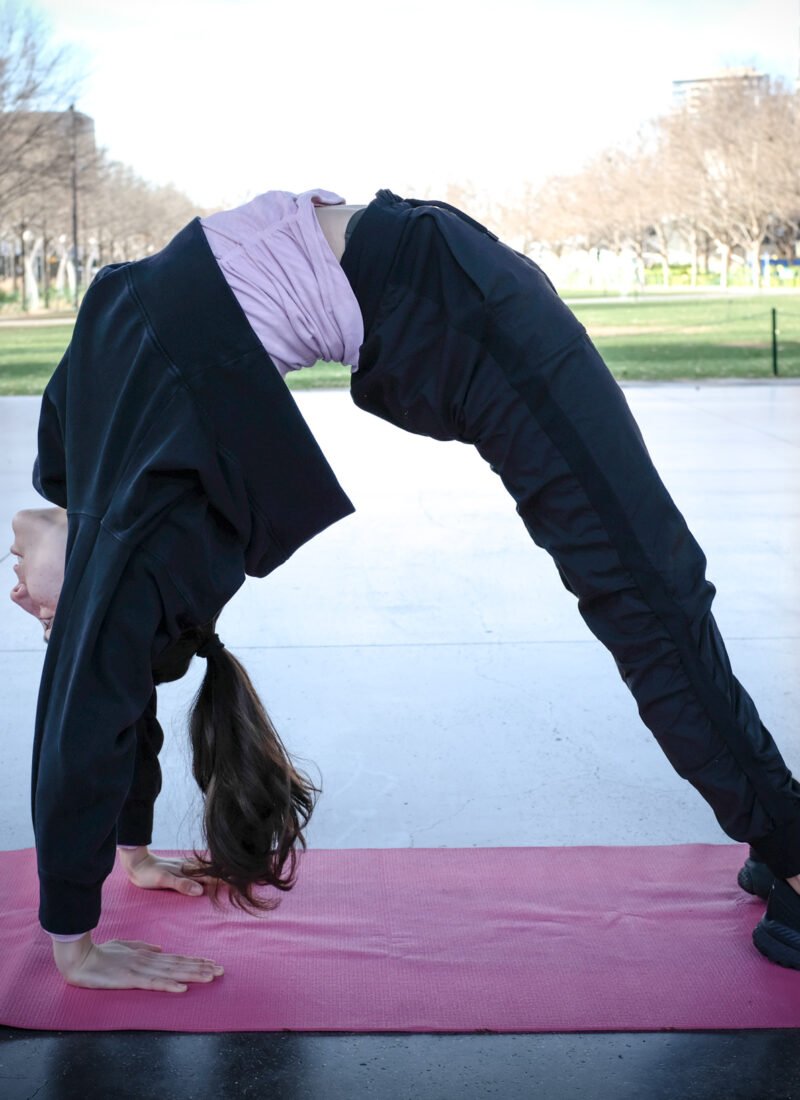
Also known as back bridge, wheel, and bridge-up, this flexibility move is a test to the mobility of the wrists, shoulders, neck, spine and hips.
Having the ability to do the bridge is not only a challenge of flexibility, but strength as well. You need strength to push yourself and hold the position. Many muscles including the hips extensors, back extensors, and shoulder extensors will be fired up to hold this position.
BEFORE YOU GET STARTED:
Before starting bridge training, it is important to understand a few things. I recommend a few prerequisites before beginning backbend training:
BE ABLE TO DO WALL HANDSTAND
In the bridge position, you will be upside down. I recommend being able to perform at a minimum a wall-assisted handstand. Being comfortable in an upside down position is very important.
HAVE SOME WRIST CONDITIONING BACKGROUND
The bridge puts a lot of pressure on the wrists. I recommend that you are comfortable doing push ups, handstands, or other moves that put pressure on the wrists before starting backbend training.
COMMON ISSUES:
TIGHT HIP FLEXORS
Some people have great shoulder mobility but they cannot do a bridge due to having very tight hip flexors. Tight hip flexors are a very common problem among those who sit for hours a day such as those who work in offices. This keeps your hips in the flexed position for an extended period of time, leading to tightness.
TIGHT LATS AND TRICEPS
For those who lift weights, swim, or generally exercise the upper body without balancing it out with mobility training, tight muscles are a very common problem. As a former competitive swimmer, this is a perpetual problem for me that requires consistent mobility and flexibility attention.
ALTHOUGH NO EQUIPMENT IS NEEDED, YOU MAY LIKE TO HAVE THE FOLLOWING EQUIPMENT FOR MODIFICATIONS:
- YOGA BLOCKS
- RESISTANCE BANDS
- CHAIR
- EMPTY WALL
THE EXERCISES:
1. WRIST CIRCLES
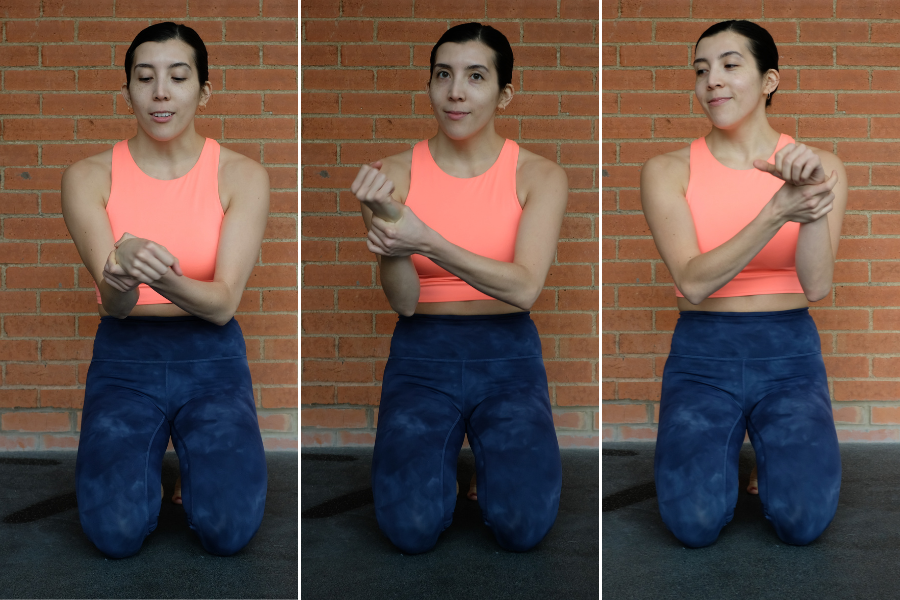
Benefits: Warm up wrists and increase wrist mobility in the backbend.
- Hold one wrist with one hand.
- Rotate your wrist slowly counter clockwise and then counter clockwise.
- Keep your breathing normal.
- Repeat on other wrist.
2. WRIST EXTENSIONS
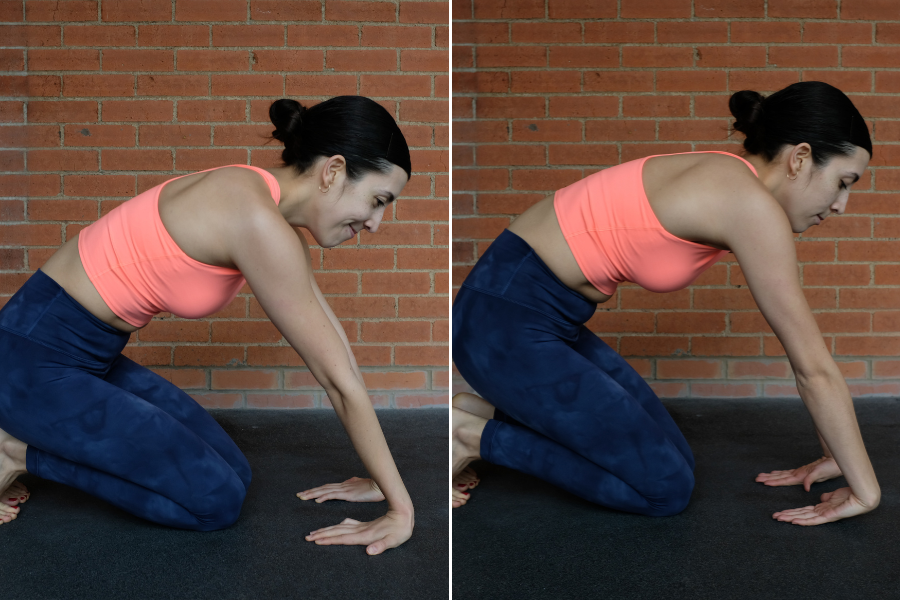
Benefits: Warms up wrists and increases wrist mobility in the backbend.
- Sit on the ground with your palms down, fingers flat and facing your body. Keep elbows straight.
- Lean your body weight backward slowly and carefully.
- Hold this position for 15 seconds.
- Repeat with palms facing up.
3. WRIST PUSHUPS/FIRST KNUCKLE PUSHUPS
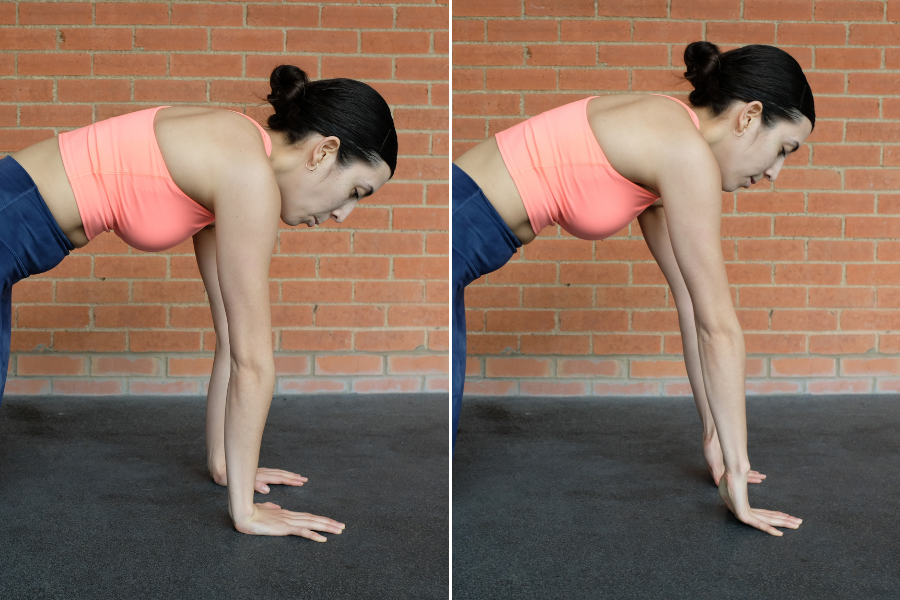
Benefits: Warms up wrists, increases wrist mobility, and strengthens the wrists for the backbend.
- Get down into a table top position with palms facing the ground.
- Keep fingers on the ground, slowly lift palms up and then put them down.
- Do 10 – 20 repetitions, 3 times.
- Make it harder: Go to the plank position.
4. CAT COW
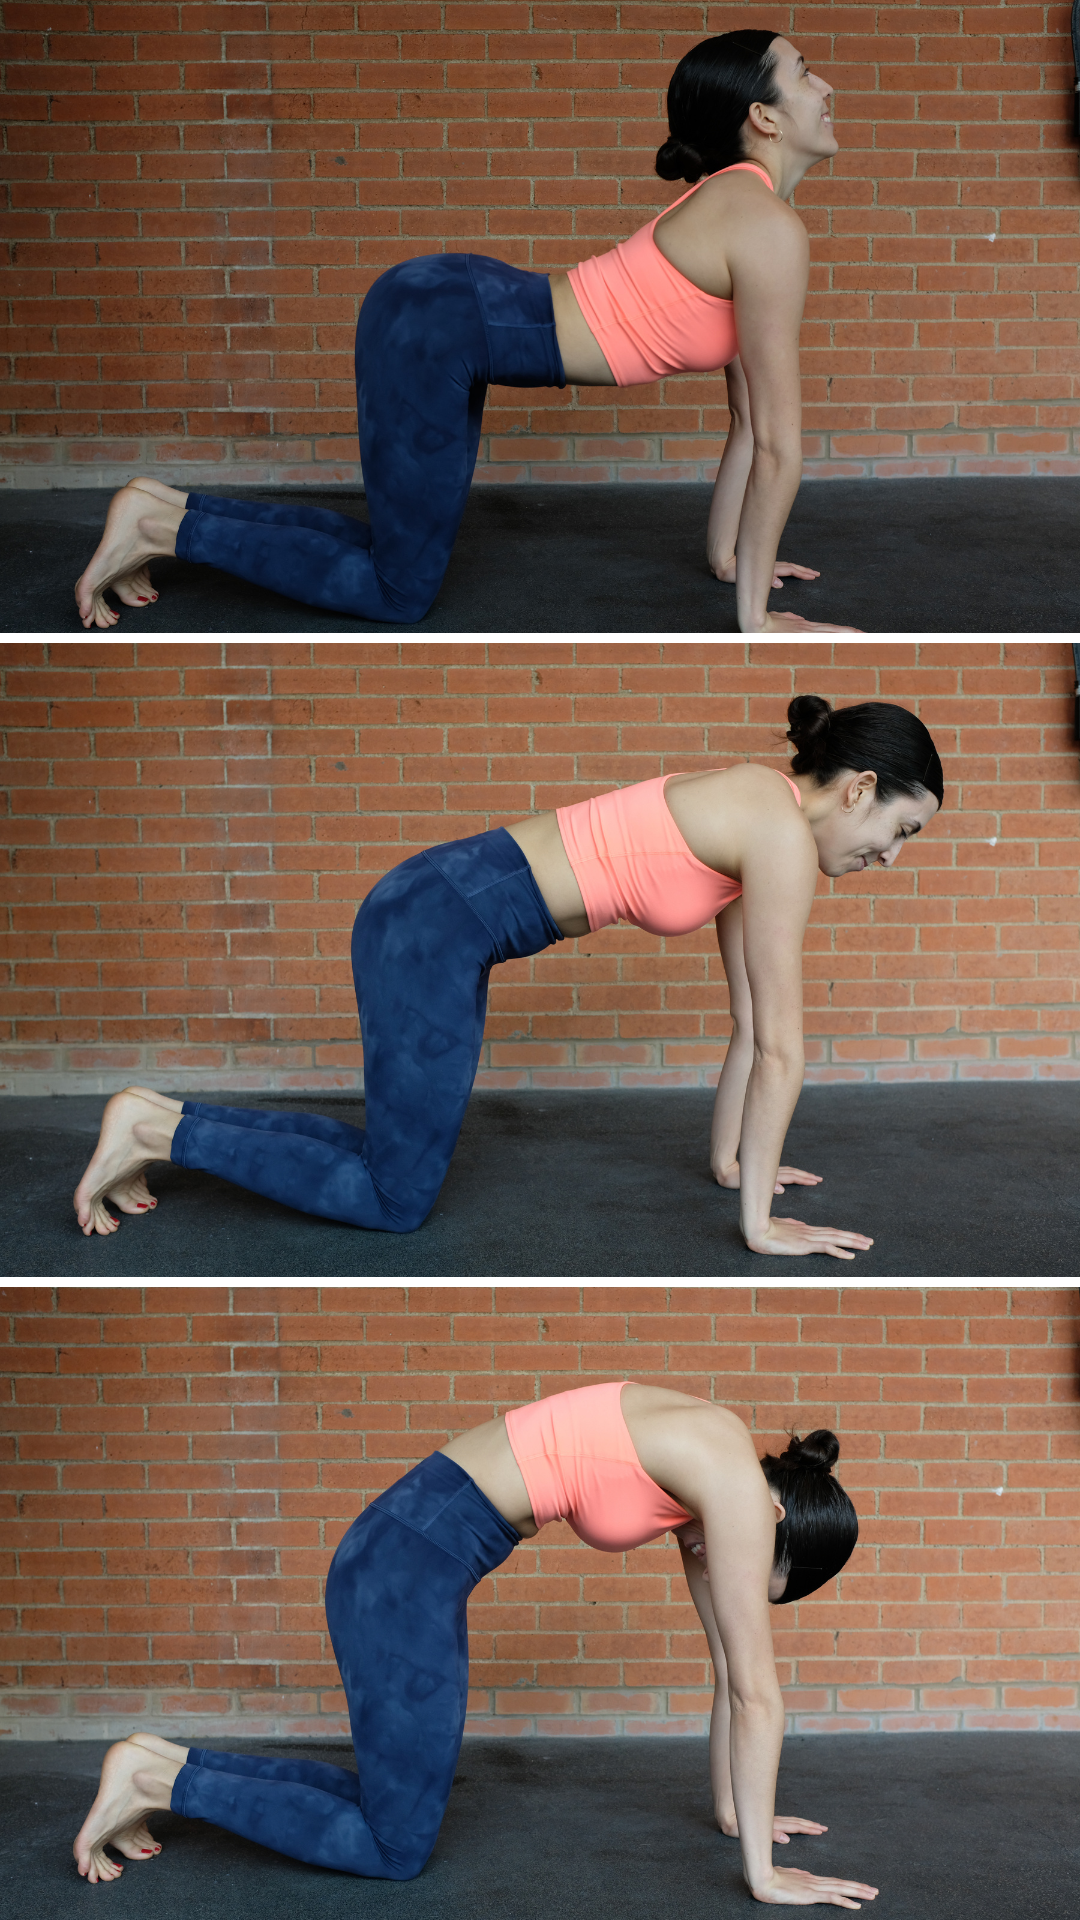
Benefits: Warms up the spine for flexibility, increases active mobility and flexibility in your back.
- Start on all fours or on your hands and knees. Keep your head in line with your neck.
- Curve your lower back and bring your head up. Tilt the pelvis up like a “cow.”
- Bring your abdomen in while arching your spine and bringing your head and pelvis down like a “cat.”
- Repeat 3 – 5 times while breathing deeply.
5. COBRA
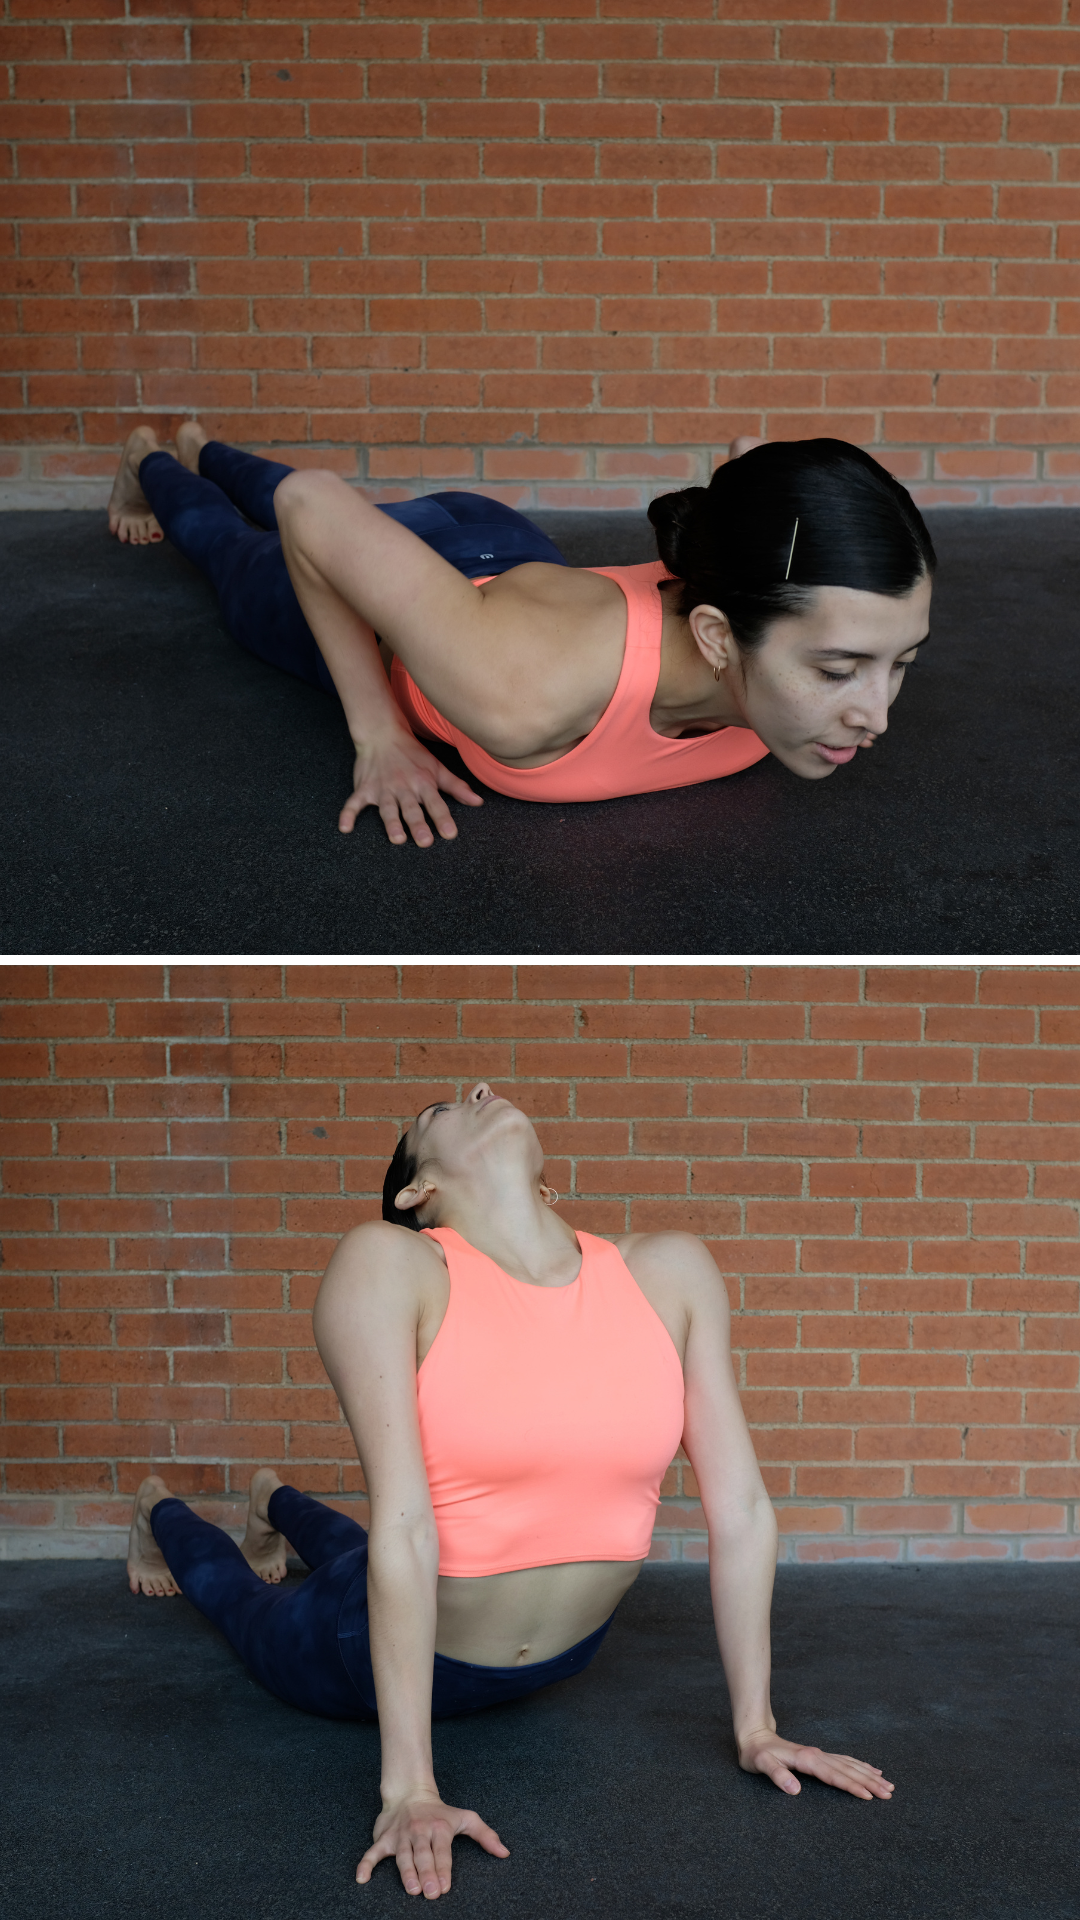
Benefits: Opens the shoulder blades, neck, and collar bones.
- Lay on the ground on your stomach. Place your palms on the floor next to your chest, with fingertips in line with the front of your shoulders.
- Press your hands firmly into the floor and lift your chest into a comfortable backbend.
- Hold for 20 – 60 seconds.
6. KING COBRA POSE
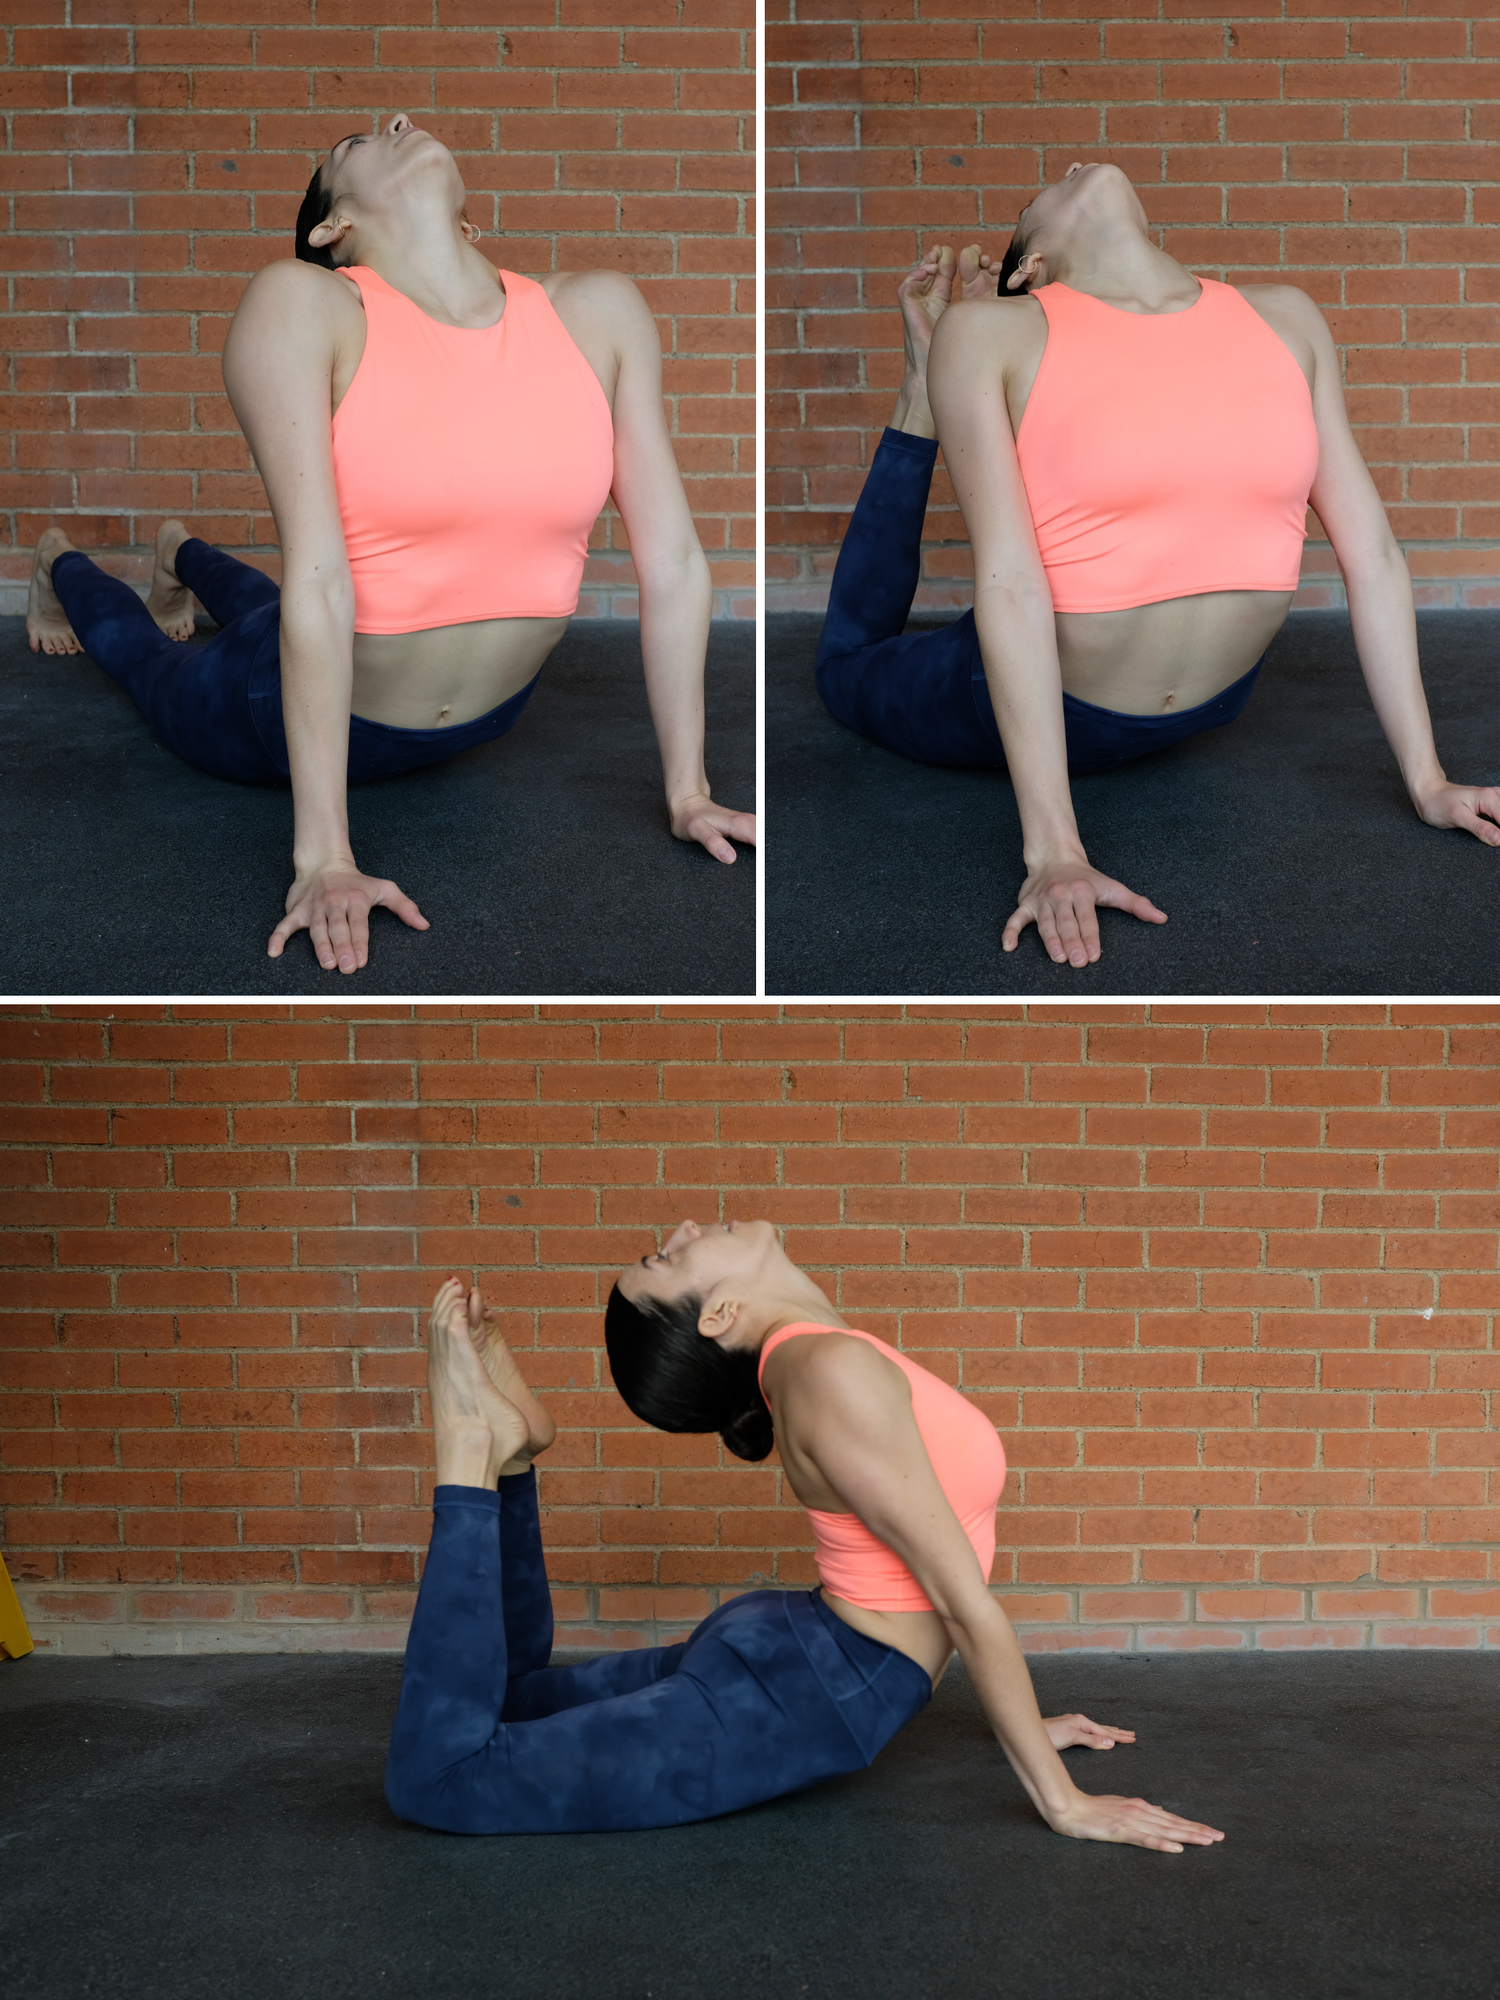
Benefits: Opens your chest and shoulders, strengthens your core, stretches your hips and quads, increases spine mobility.
- Lay on the ground on your stomach. Place your palms on the floor next to your chest, with fingertips in line with the front of your shoulders.
- Press your hands firmly into the floor and lift your chest into a backbend.
- Bend your legs and lift your heels toward your hips or your head.
- Hold for 20 – 60 seconds.
7. SUPERMAN LIFTS
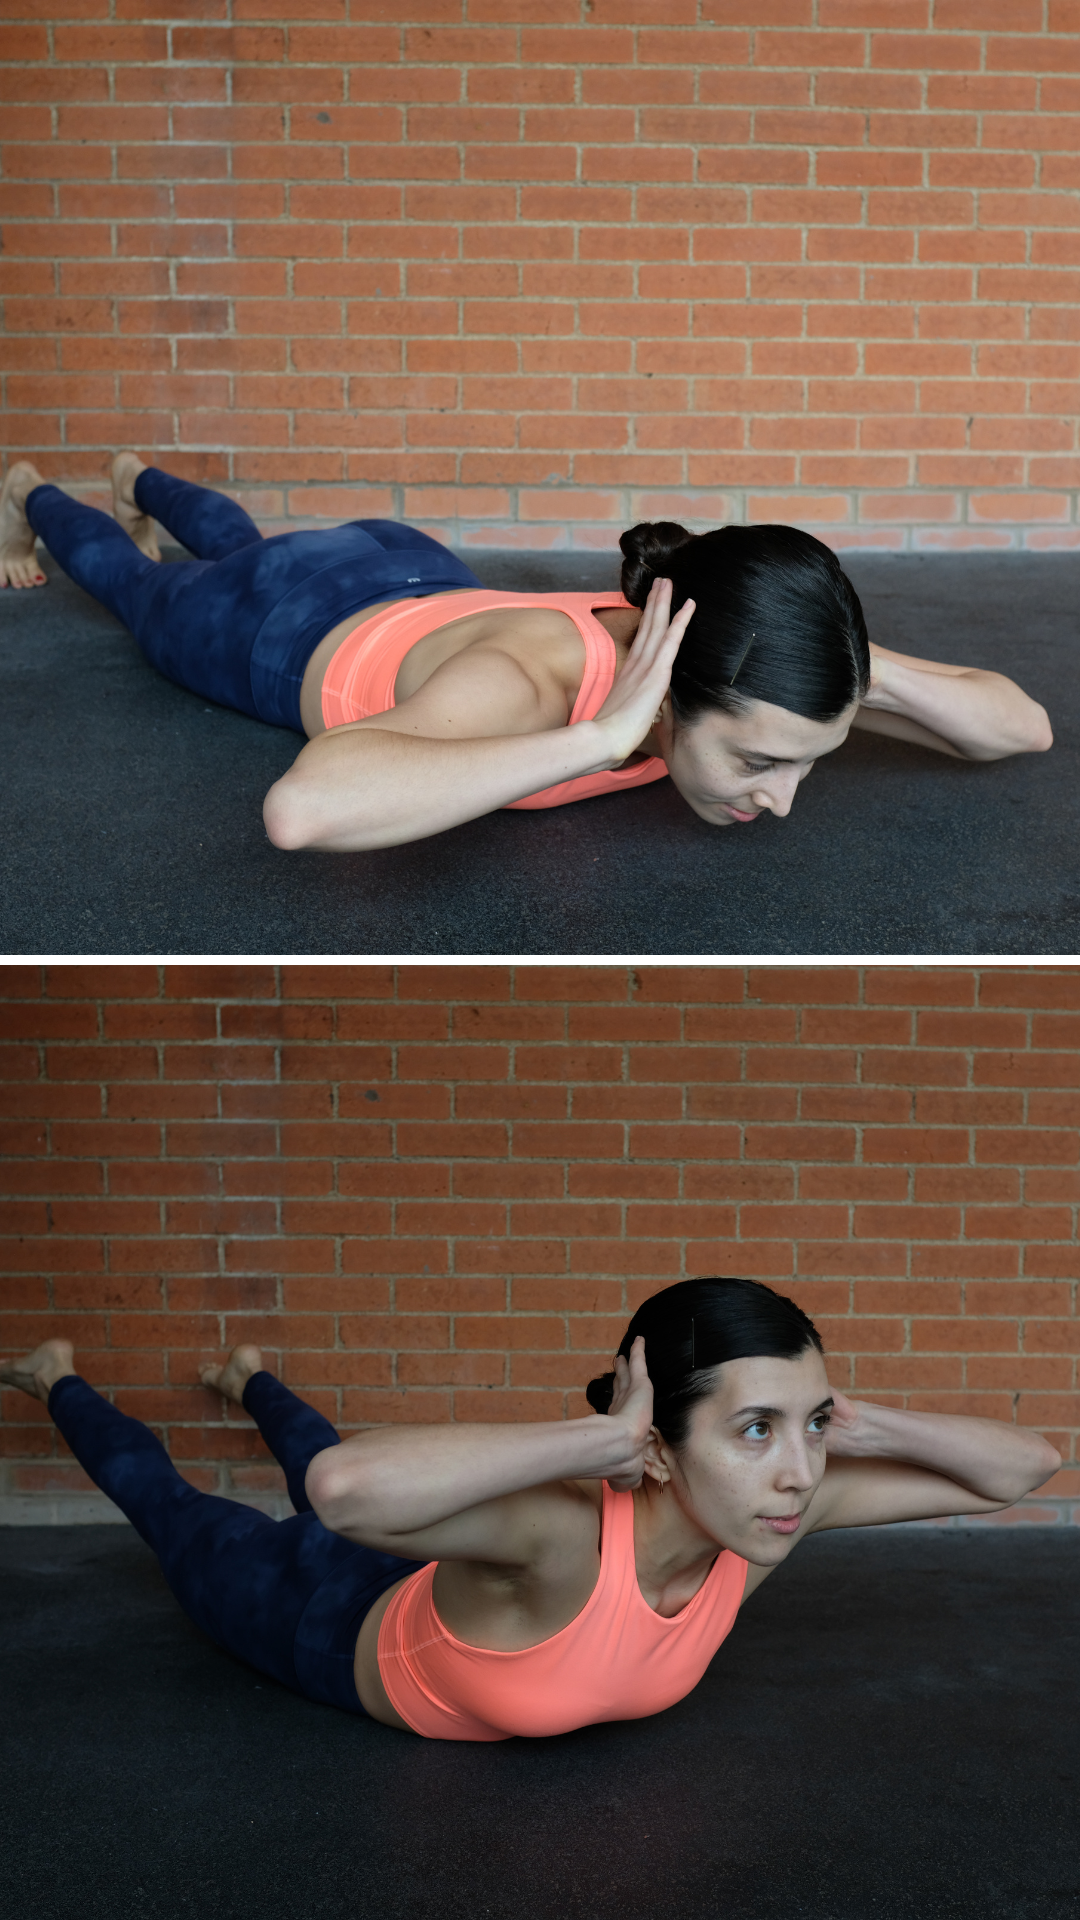
Benefits: Strengthens the spinal flexors and other surrounding muscles to support your spine and reduce risk of injury in the backbend.
- Lay on the ground on your stomach. Place your hands extended in front of you or on your head by your ears.
- Simultaneously lift your arms and legs off the ground while keeping your core engaged.
- Repeat 8 – 10 times for 3 sets.
8. SUPERMAN HOLD

Benefits: Strengthens the spinal flexors and other surrounding muscles to support your spine and reduce risk of injury in the backbend.
- Lay on the ground on your stomach. Place your hands extended in front of you or on your head by your ears.
- Simultaneously lift your arms and legs off the ground while keeping your core engaged.
- Hold for 30 seconds – 1 minute.
9. SHOULDER BRIDGE
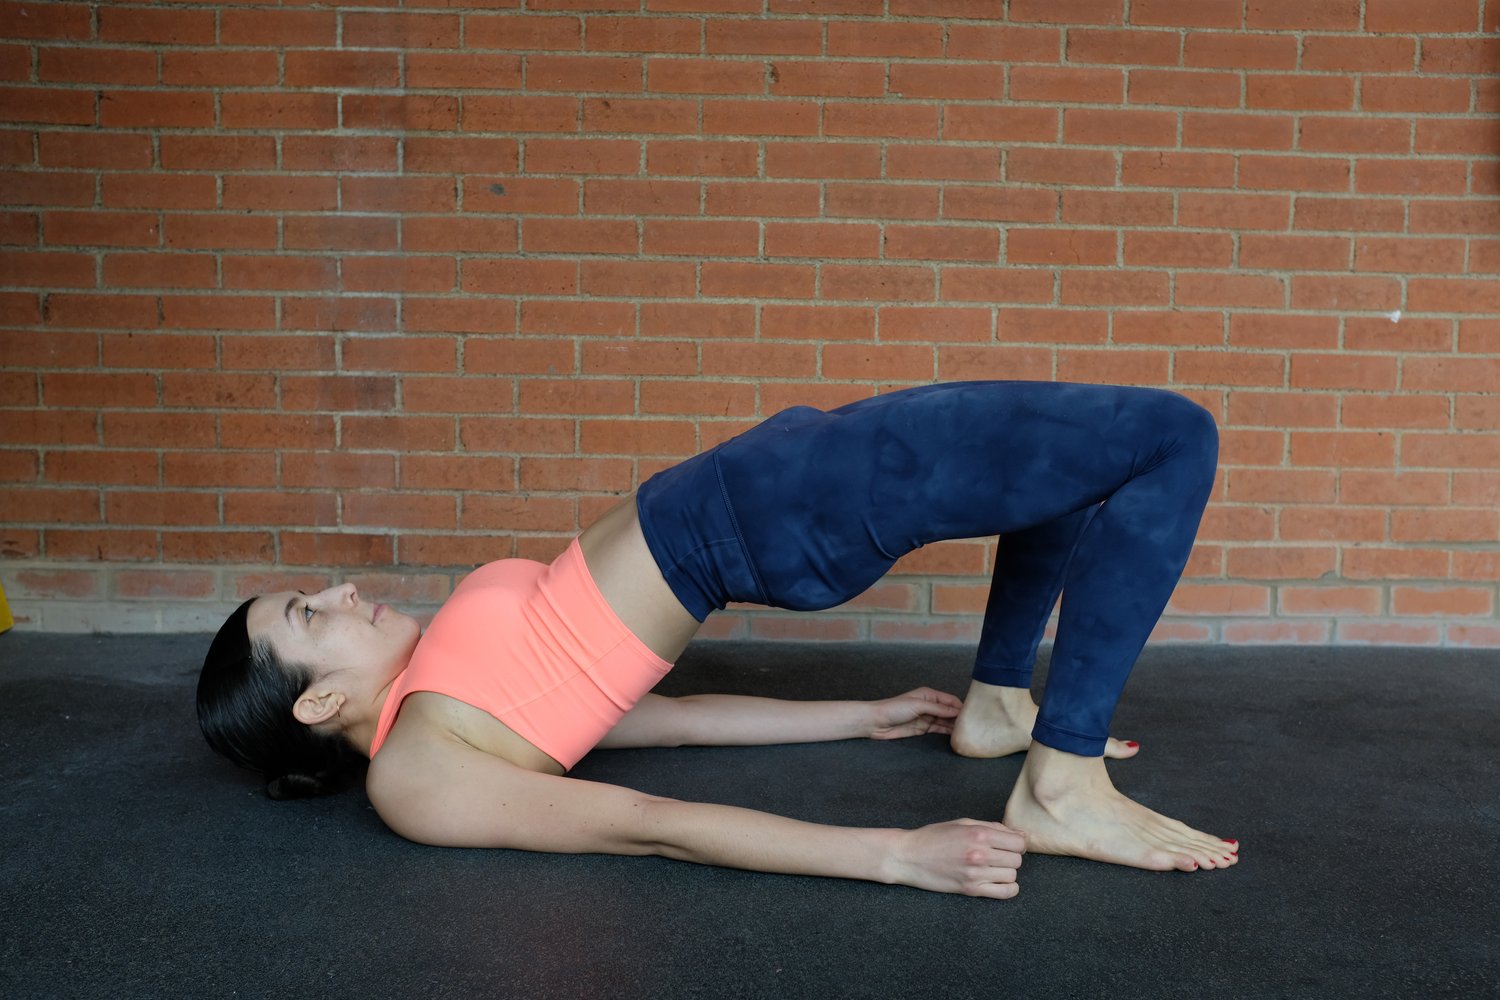
Benefits: Strengthens the glutes, hamstrings, back and abdominal muscles as well as mobilizes the spine.
- Lay on your back with your legs bent and hip-width apart. Keep your arms by your side with palms down.
- Lift your pelvis and hips, creating a diagonal line from knee to shoulder.
- Hold for 30 seconds – 1 minute.
10. SHOULDERS STRETCH WITH HANDS ON WALL

Benefits: Stretches your back, shoulders, and chest.
- Place both hands on a wall at shoulder height.
- Walk your feet back until your arms are straight, lean your head towards the ground through your shoulders.
- Bend at your hips to deepen the stretch in your shoulders.
- Hold this stretch for 15 – 30 seconds.
11. EXTENDED PUPPY POSE
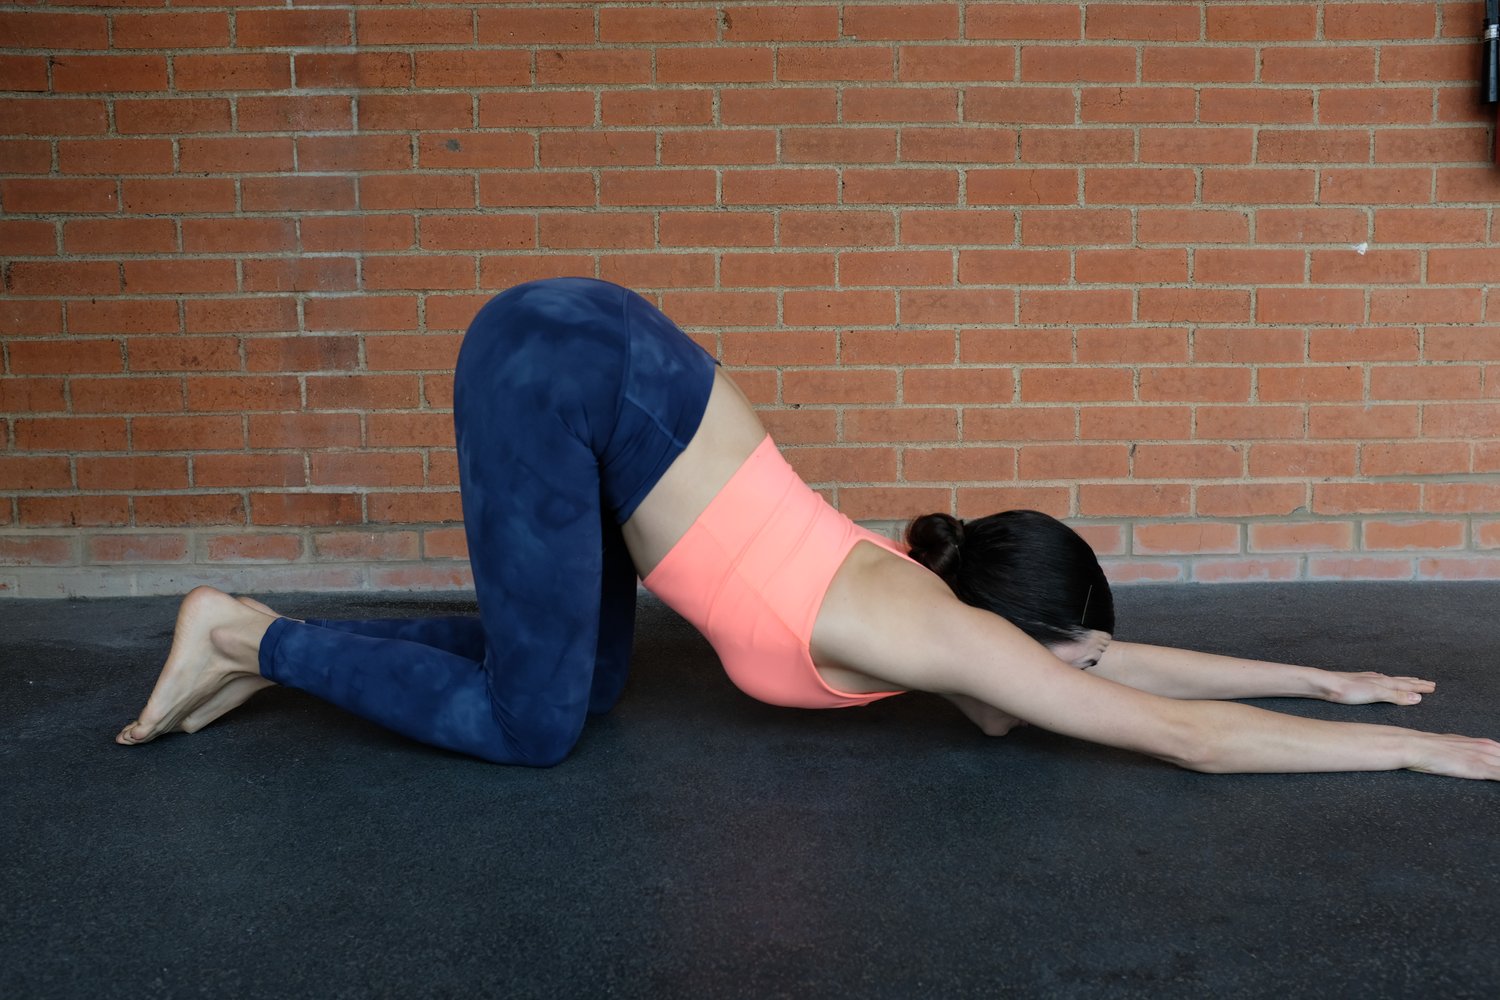
Benefits: Stretches your back, shoulders, and chest.
- Start on all fours (on your hands and knees.) Keep your head in line with your neck.
- Extend your hands forward while simultaneously moving your hips towards your heels.
- Aim to get your shoulders flat to the ground.
- Hold this stretch for 15 – 30 seconds.
12. ON THE GROUND CHEST STRETCH

Benefits: Stretches your back, shoulders, and chest.
- Lay on your stomach with your left arm extended to the side with a 90 degree bend in your elbow.
- Lift up your right leg and roll over onto your left side.
- Find the floor with your right foot.
- Hold for 30 seconds to one minute.
- Repeat on the opposite side.
13. ELBOWS ON ELEVATED SURFACE
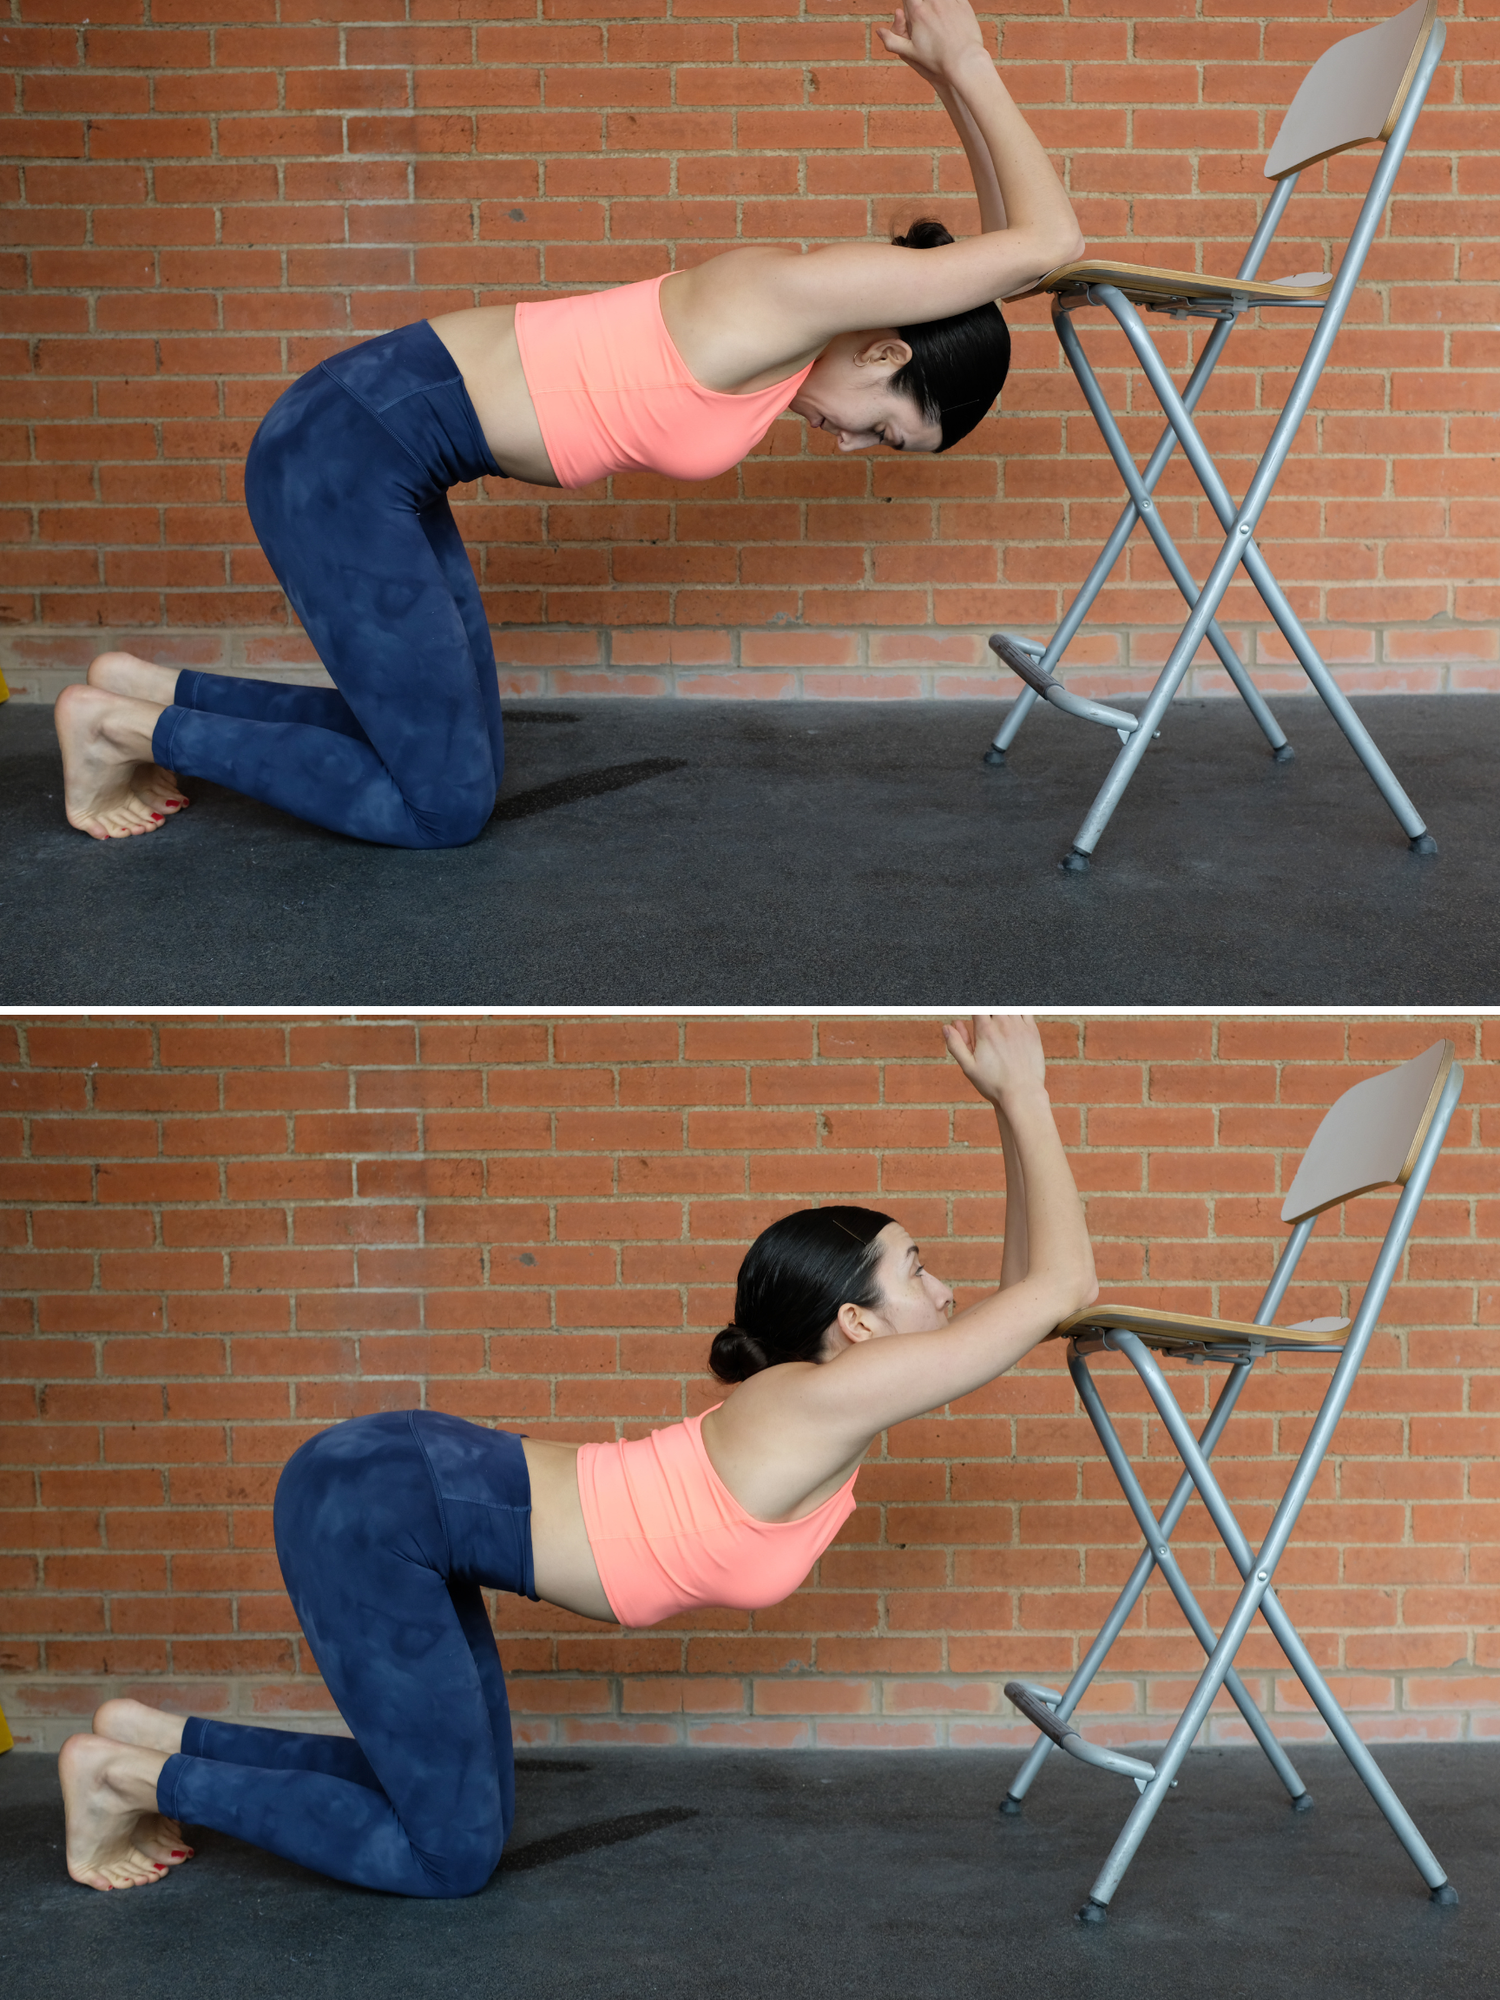
Benefits: Stretches your back, shoulders, and chest.
- Sit on your knees and face a chair, box, or any elevated surface. Place your elbows on the elevated surface.
- Lean your chest towards the ground and push your head through your shoulders, deepening your stretch to open your shoulders.
- Hold for 15 seconds – 1 minute.
- Alternate the movement by looking up and arching your back.
- Hold for 15 seconds – 1 minute.
14. SEATED LAT SIDE STRETCH
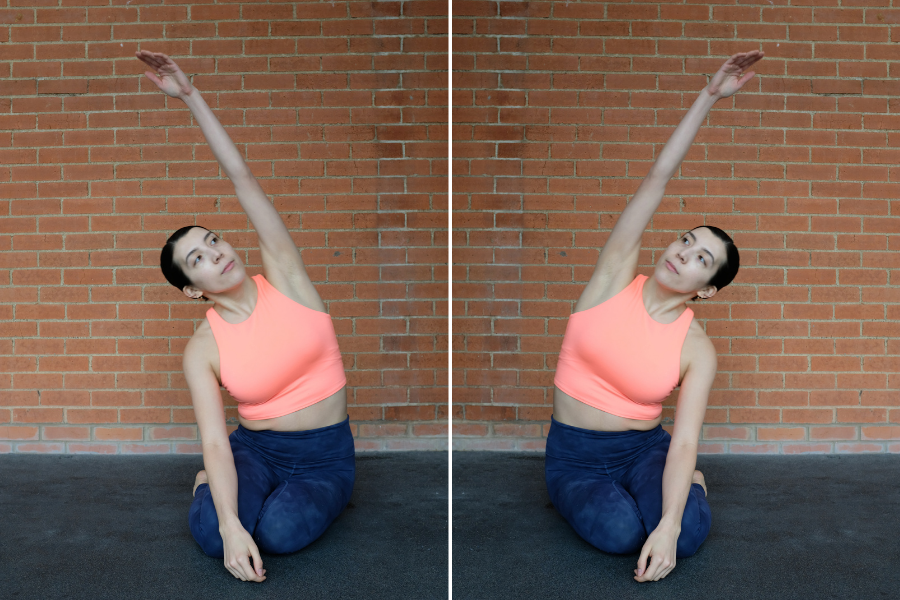
Benefits: Stretches your back, shoulders, and lats.
- Sit on the ground on your knees, with your bottom on your heels.
- Lean your hips to one side and reach your hand over head to the opposite side.
- Hold for 15 seconds – 1 minute.
- Repeat on the other side.
15. LUNGES (TO OPEN HIP FLEXORS)

Benefits: Targets the hips, quads, and glutes.
- Step forward with your right leg and keep your left leg straight behind you. Place your right foot flat on the floor in front of you, knee bent.
- Lean forward, stretching your left hip flexor toward the floor.
- Engage your glutes and abs as this will allow you to push your left hip close to the floor.
- Hold for 30 seconds – 2 minutes.
- Switch sides and repeat.
16. FULL BRIDGE
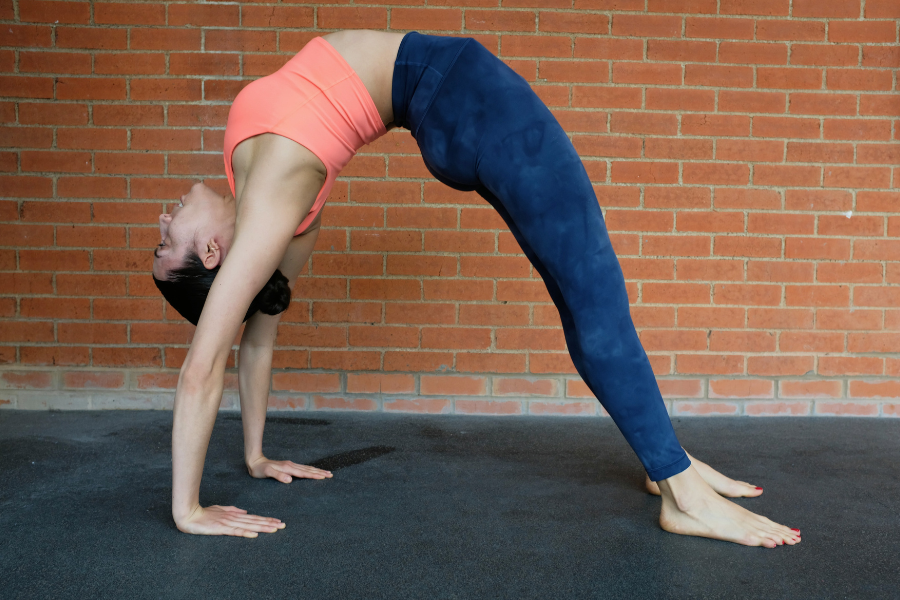
Benefits: Stretches your back, shoulders, and chest.
- Lay on your back with your legs bent and hip-width apart. Place your hands by your ears, palms down and elbows up.
- Push through your shoulders and lift your body. Straighten your arms as much as you can.
- Focus on keeping your core, legs and butt muscles tight. Breathe.
- Hold for 10 seconds to one minute, depending on your flexibility and endurance at this point.
*Note: Strive to straighten your elbows and legs. You may not be able to for a while, but keep working on it and you will get there.
17. BRIDGE PUSH UPS
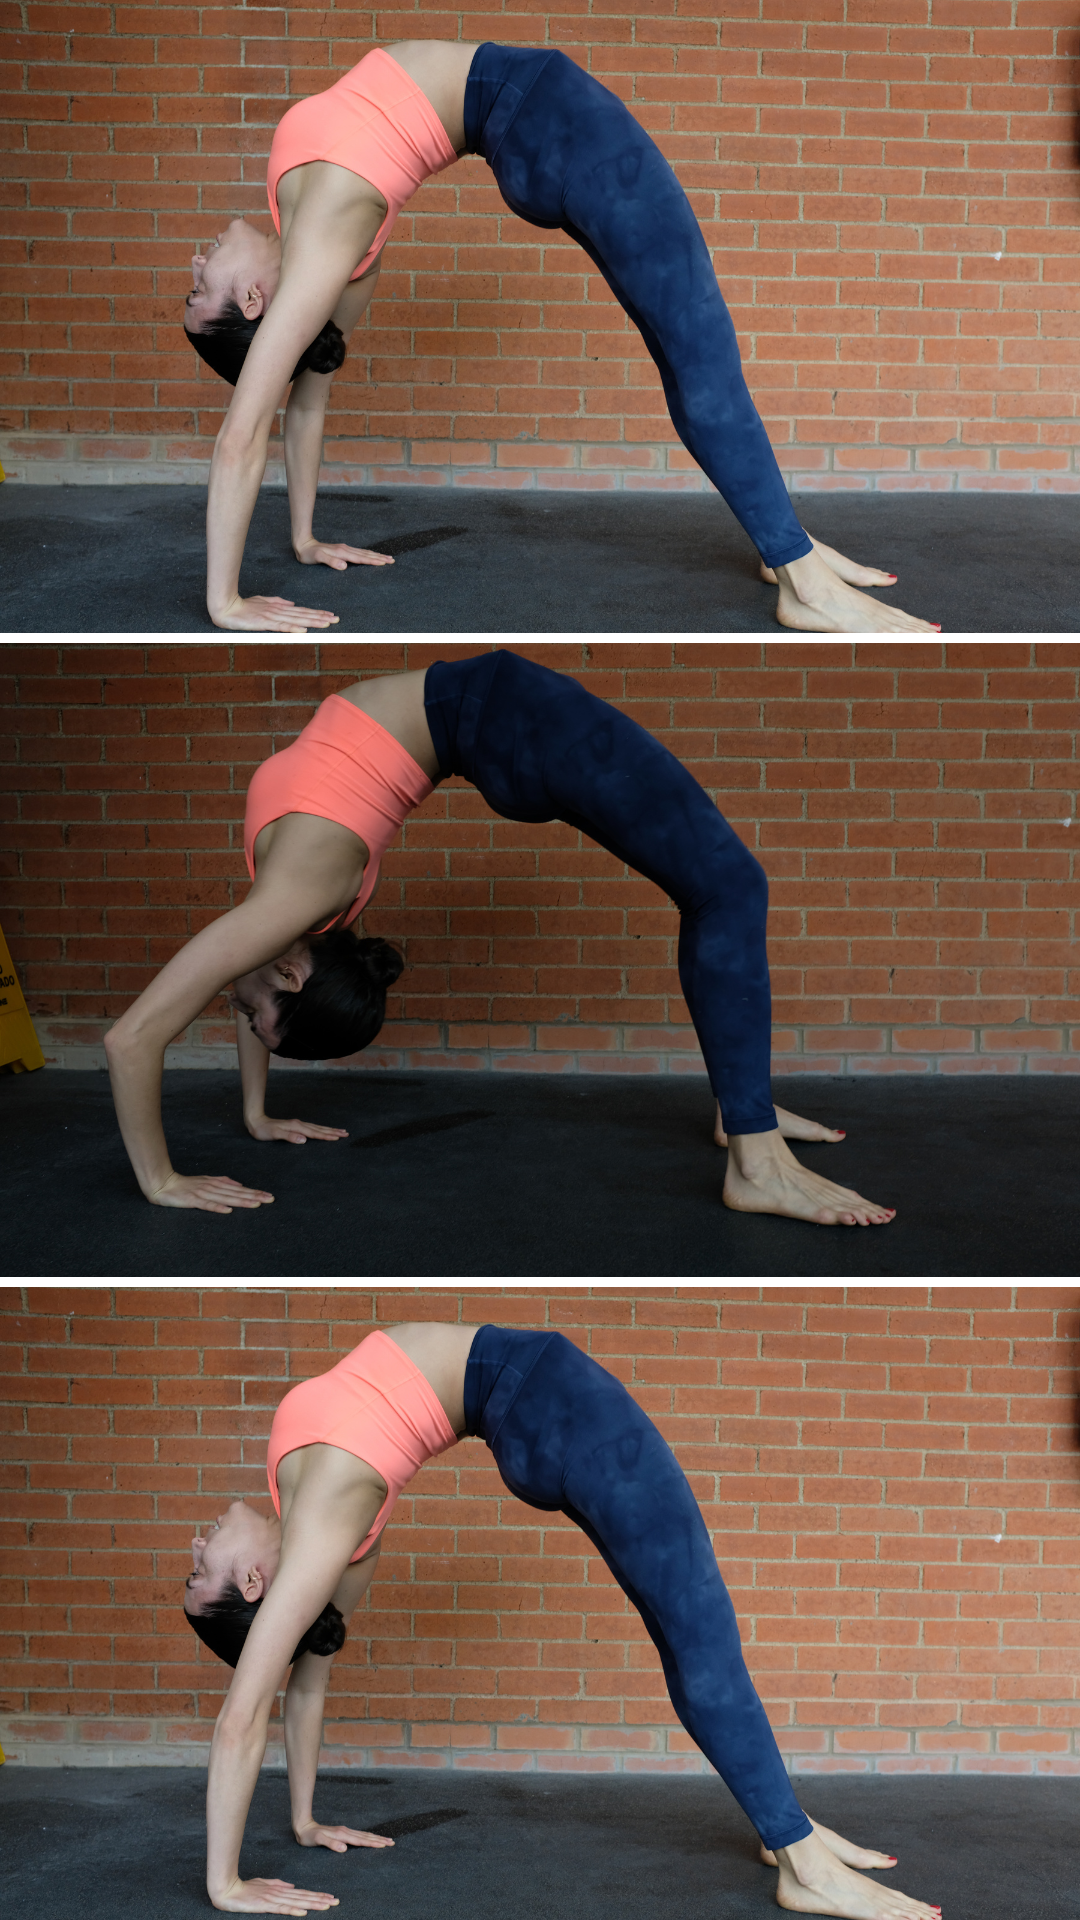
Benefits: Stretches and strengthens your back, shoulders, and chest.
- Get into the bridge position – see above.
- Bend your elbows and lower your head slowly.
- At your lowest position, straighten your elbows to push your head up.
18. BRIDGE HOLDS

Benefits: Stretches and strengthens your back, shoulders, and chest.
- Get into the bridge position – see above.
- Hold for 10 seconds – 1 minute, or to failure.
19. ACTIVE BACK BEND UP AND DOWN WALL
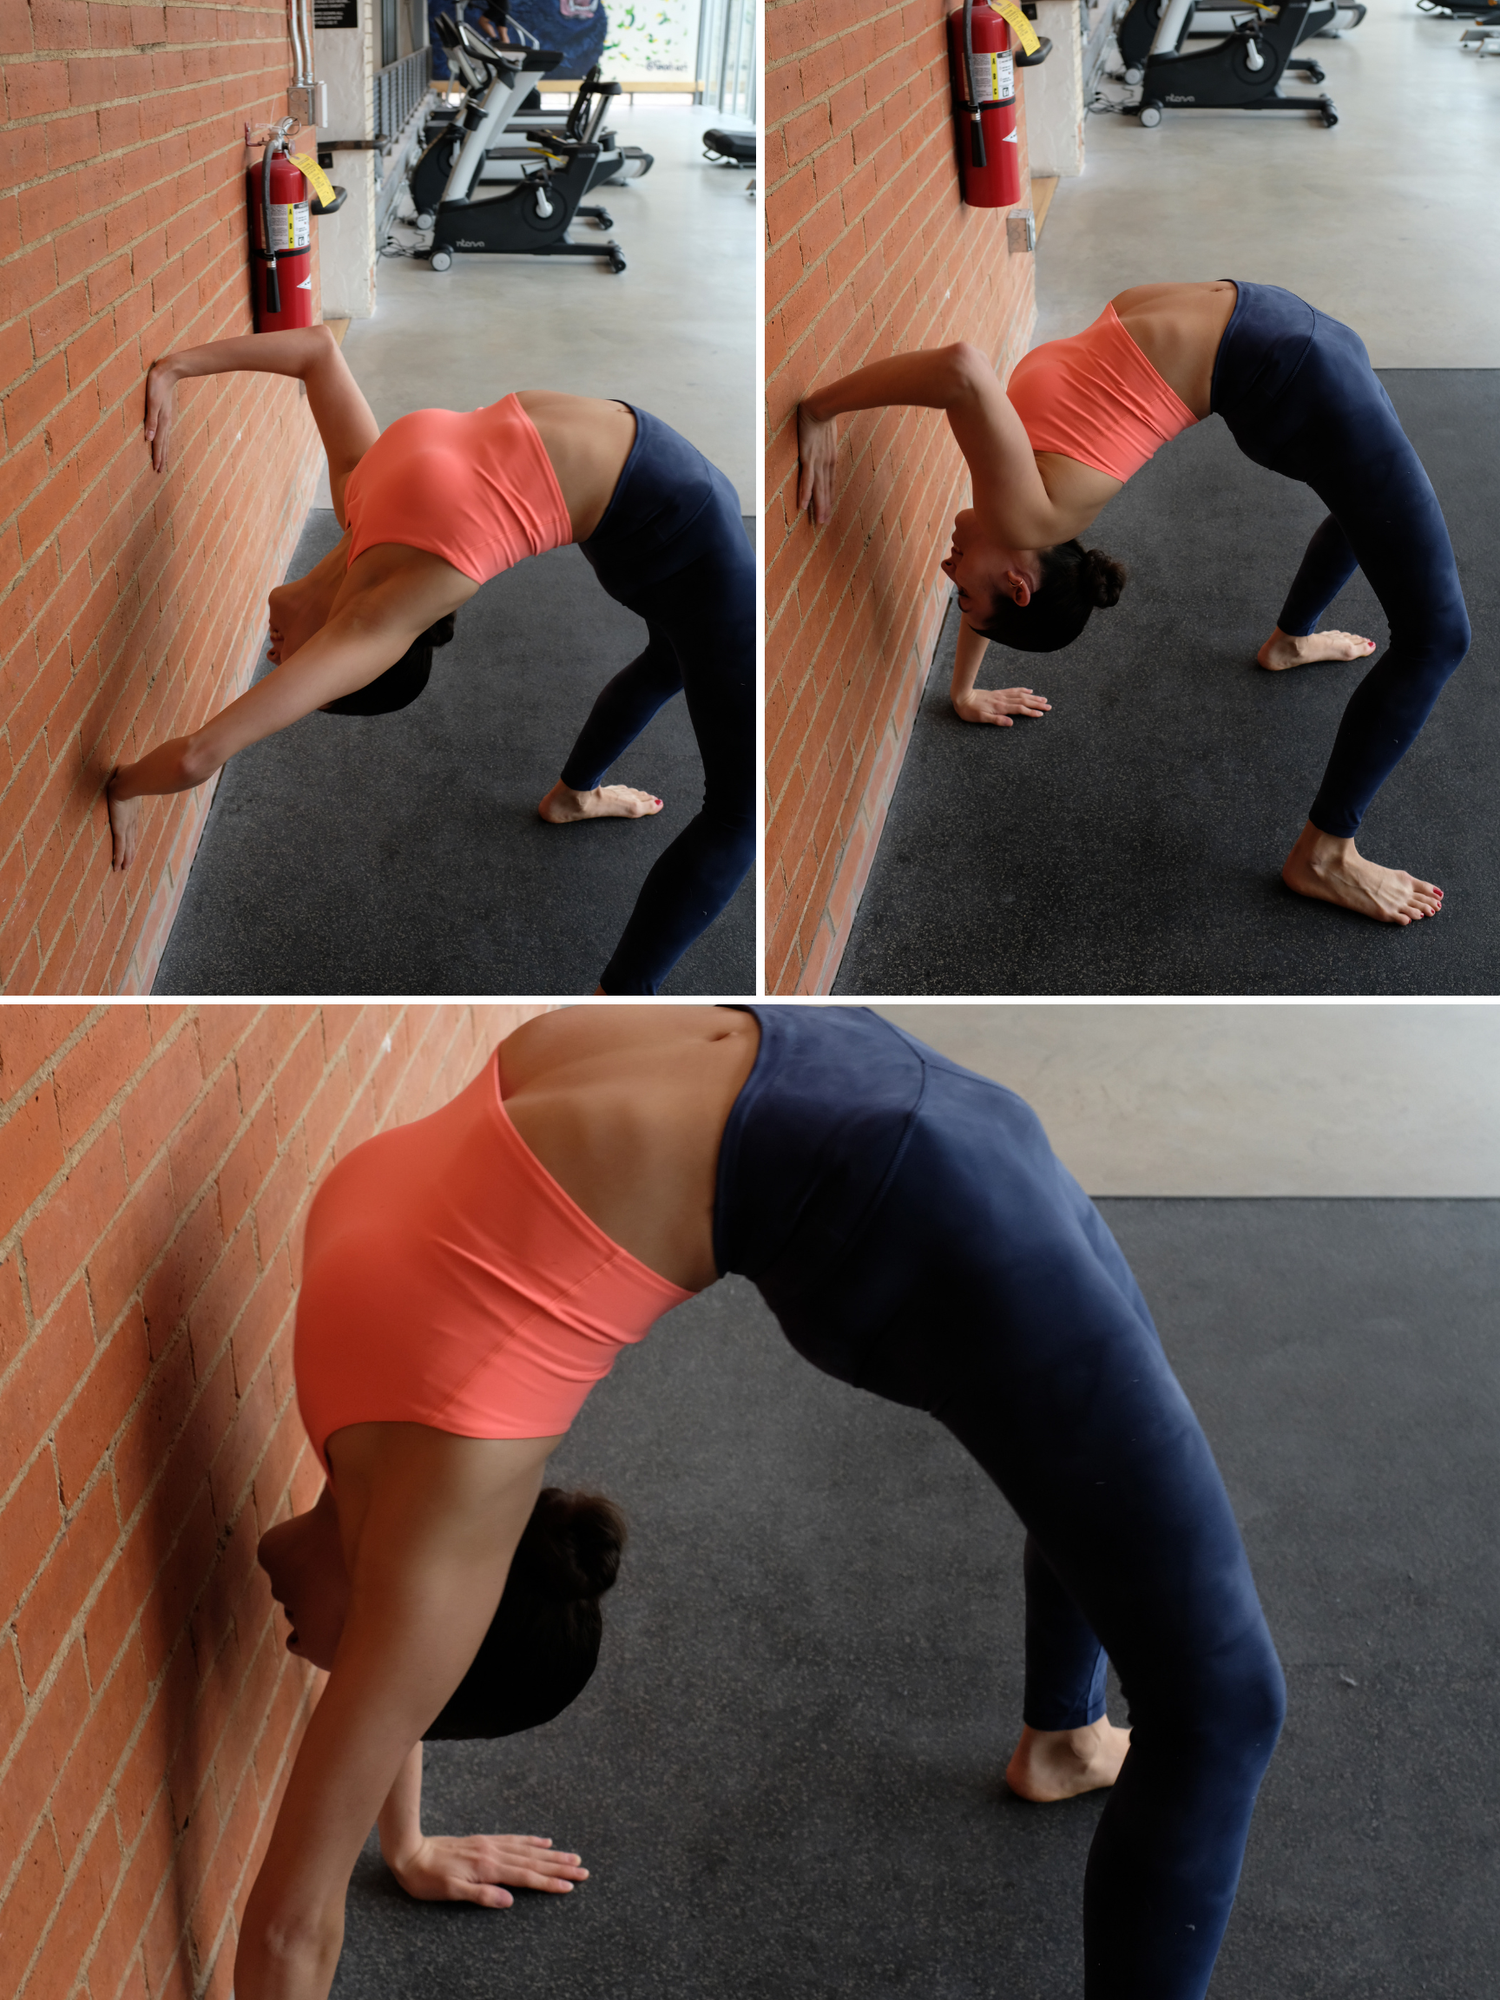
Benefits: Stretches and strengthens your back, shoulders, and chest.
- Stand with feet shoulder-width apart and back facing a wall.
- Raise your arms overhead. Lengthen through the sides of your waist to grow even taller.
- Begin lifting your chest toward the ceiling as you gradually begin to reach your fingertips toward the wall behind you. See if you can touch the wall.
- Attempt to walk your fingertips down the wall slightly.
- If able, go all the way to the ground.
TIPS:
- If you are experiencing wrist pain due to wrist mobility issues, elevate your hands on blocks or another elevated surface. By doing so, you lessen the mobility required for the wrist joint and therefore put less pressure on the wrists.
- Lock your elbows. If you can’t lock your elbows, try elevating your legs on something such as a chair, bench, sofa, or box.
- Push your shoulders towards your ears for more range of motion.
- Be consistent with training your back flexibility three times a week. With dedication, you WILL see results.
- Listen to your body. If at any point you feel sharp, immediate pain, stop what your are doing.
This article was all about the best stretches for backbend.
These daily exercises should be incorporated into your routine to see results. As always, listen to your body and learn to recognize your limits. I hope you found this article helpful in your flexibility journey.
Disclaimer: Exercise is not without its risks. If at any point while doing a workout from this website you begin to feel faint, dizzy or have physical discomfort, you should stop immediately and consult a medical professional. By performing any fitness exercises without supervision such as with at-home workouts, you are performing them at your own risk. See a fitness professional to give you advice on your exercise form. Elizabeth Vigen will not be responsible or liable for any injury or harm you sustain.

